在Simple Twitter 專案開發心得提到當初刻畫面時,遇到 Modal 跑版問題,本篇文章將介紹這些可愛的 bug 是如何發生的,以及該如何解決。
前情提要
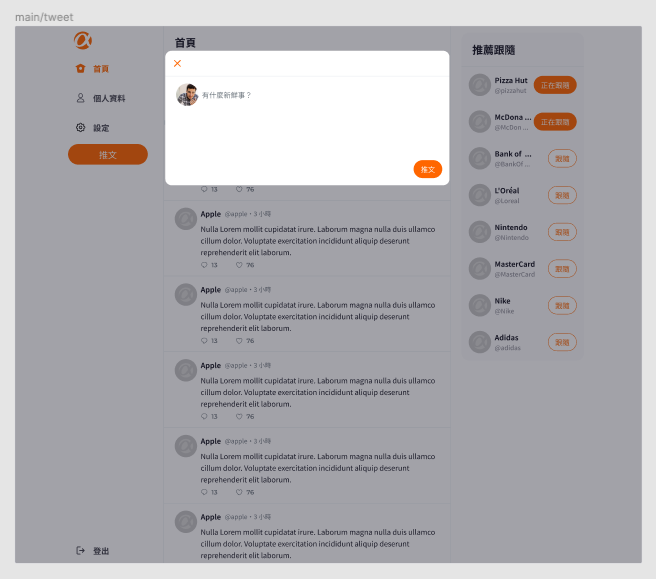
Simple Twitter 專案有規定的設計稿,筆者必須 1:1 完整將畫面還原,根據下方的設計稿,可以快速整理幾點 Modal(畫面中上方白色的框框部分) 的基本資訊:
- 整體網頁分為左(導覽列)、中(推文區)、右(推薦跟隨區)三塊。
- Modal 應在中間區塊(推文區)。
- Modal 與頁面上方保持固定距離。
由上方整理出來的資訊可知,這次主要要解決的即是以下兩個問題:
- 要如何讓 Modal 正確顯示在中間區塊(X軸)?
- 要如何讓 Modal 正確顯示在頁面上方固定位置(Y軸)?
結與解
一、要如何讓 Modal 正確顯示在中間區塊(X軸)?
- 身為全端組,想到要做 Modal 一開始想到的就是 Bootstrap 的 Modal,於是便興高采烈的拿著複製好的程式碼貼到中間區塊中:
{{!-- 中間欄位 --}}
<div class="col col-7 border p-0" id="center-column">
    <div id="body" style="position:relative; overflow: auto;height:100vh">
    {{{body}}}
    </div>
{{!-- 彈出視窗 Modal --}}
    {{> modal}}
</div>
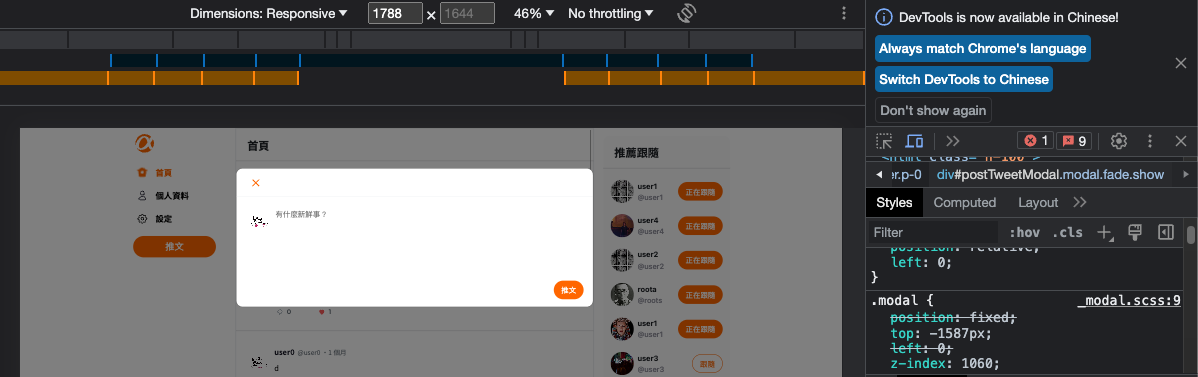
- 但是等等,按下推文按鈕後,只出現灰底是怎樣?

- 趕緊打開開發者工具,發現 Modal 竟然出現在頁面下方!?
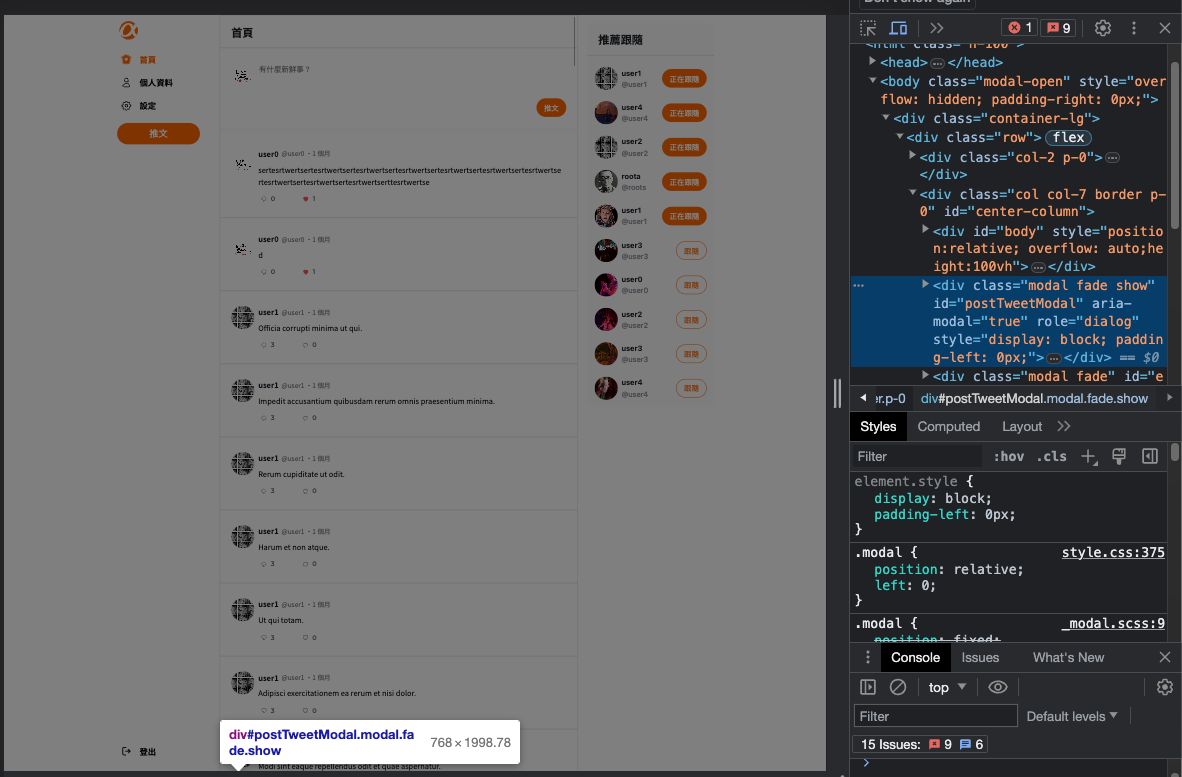
- 這個簡單我會修,把 Modal 的 top 調成負值就 ok 啦!
- 把 top 調成負值後,Modal 成功顯現,寬度也確實跟設計稿一樣可以填滿中間欄位。
二、要如何讓 Modal 正確顯示在頁面上方固定位置(Y軸)?
正當我以為搞定這塊燙手山芋後,組員馬上來回報,「為什麼我新增貼文後,Modal 的位置又跑掉了!?」

再檢查一次程式碼後,發現因為中間欄位的元素排佈是 position: relative,加上原先 Modal 的 top 是定值,導致只要推文數量有異動,Modal 的 Y軸位置就會跟著跑掉,現在問題知道了,要怎麼辦呢?
- 嘗試一:將 Modal 位置調到推文區塊上方 → Modal 會把推文往下推,不符合設計稿。
- 嘗試二:直接將 Modal 改成 position: fixed → Modal 變成把整個畫面寬度當父元素,左右直接撐滿畫面。
- 嘗試三:把推文區塊改成 position: fixed → 整體網頁佈局壞掉。
等等等等,繞了接近一天的歪路後...一個有趣的想法冒出來:
原先的做法有問題,只是因為不能將 Modal 的 top 設定為定值,那我能不能依照頁面調整 Modal 的 top 值呢?
在經歷與 chatGPT 一連串溝通後,了解了要如何在 express.js 中使用 addEventListener,也知道如何設定頁面高度的監聽器,結果如下:
const targetNode = document.getElementById('exampleModal')
// 取得目前現在視窗大小的函式
function updatePageHeight() {
  let pageHeight = Math.max(
    document.documentElement.scrollHeight,
    document.body.scrollHeight
  )
  pageHeight = pageHeight - 30
  return pageHeight
}
let pageHeight = updatePageHeight()
// 如果視窗有被調整,要重新取得視窗大小
window.addEventListener('resize', function () {
  pageHeight = updatePageHeight()
})
const observer = new MutationObserver(function async(mutationsList, observer) {
  for (const mutation of mutationsList) {
    if (mutation.type === 'attributes' && mutation.attributeName === 'class') {
      // 如果監聽對象的 class 有 show 的話
      if (mutation.target.classList.contains('show')) {
        // 將他的 top 設定到固定位置
        targetNode.style.top = `-${pageHeight}px`
      }
      console.log('點擊成功')
    }
  }
})
const observerOptions = { attributes: true, attributeFilter: ['class'] }
observer.observe(targetNode, observerOptions)
分為三條路線講解:第一條是取得現在頁面的高度,利用 Math.max 找出頁面現在最高的是哪個值(包含上下滾動的頁面),將該值減去 30 後留給 Modal 的 top 值用,並將這段程式碼打包為一函式,供第二條路線使用。
// 取得目前現在視窗大小的函式
function updatePageHeight() {
  let pageHeight = Math.max(
    document.documentElement.scrollHeight,
    document.body.scrollHeight
  )
  pageHeight = pageHeight - 30
  return pageHeight
}
let pageHeight = updatePageHeight()
第一條路線結束後,代表使用者只要打開網頁,就可以取得正確的頁面高度值,但難保使用者不會在過程中變更瀏覽器視窗大小,進而影響功能,因此第二條路線再針對視窗做監聽,確保頁面高度值永遠都是正確的:
// 如果視窗有被調整,要重新取得視窗大小
window.addEventListener('resize', function () {
  pageHeight = updatePageHeight()
})
第三條路線則是重中之重,Modal 畢竟不是隨時出現在頁面上的,什麼時候要觸發改變它的 top 值呢?這邊使用 Modal 獨有的特性――「被點擊時會出現 show 的 class」來做判斷,程式碼如下:
const targetNode = document.getElementById('exampleModal')
const observer = new MutationObserver(function async(mutationsList, observer) {
  for (const mutation of mutationsList) {
    if (mutation.type === 'attributes' && mutation.attributeName === 'class') {
      // 如果監聽對象的 class 有 show 的話
      if (mutation.target.classList.contains('show')) {
        // 將他的 top 設定到固定位置
        targetNode.style.top = `-${pageHeight}px`
      }
      console.log('點擊成功')
    }
  }
})
const observerOptions = { attributes: true, attributeFilter: ['class'] }
observer.observe(targetNode, observerOptions)
observer 會遍歷 targetNode,在監聽對象的 class 出現 show 時,馬上將 Modal 的 top 改成前面取得的 pageHeight,至此,這個功能才算告一段落。
在完成單個 Modal 的功能後,後續又將其他 Modal 也包進去 targetNode 中,讓 observer 可以遍歷到所有 Modal,進而讓所有的 Modal 可以顯示在正確的位置。
這次的經歷讓我對工程師的工作日常有更深的了解,透過對問題的拆解、分析,找到合適的解決方法。